|

|
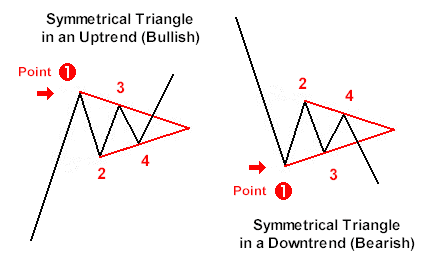
Symmetrical triangles in uptrends are bullish,
while symmetrical triangles in downtrends are bearish. For a
bullish pattern, the first point (the point farthest left or
the earliest) is at the top. For a bearish pattern, the
first point is at the bottom. |
|
 |
|
|
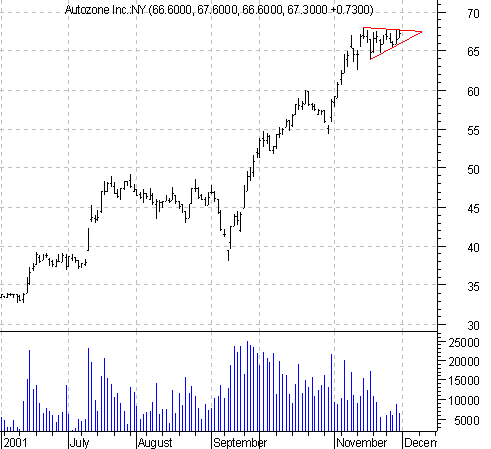
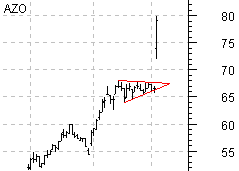
The first one we'll look at is AutoZone (AZO)
and it's shown with a 'symmetrical' triangle in an uptrend
(which is bullish). A quick way to tell if it's a bullish
triangle or a bearish triangle is to see where the first
point of the triangle begins. |
 |
|
Since the market in this example is at
the very top of the pattern (the market should not go
into the apex), simply getting in ASAP would be a low risk entry for a high probability trade. 'Low risk
entry' because since the breakout point is immediately above
and the failure point is such a short distance below, the
risk to reward ratio is clearly in your favor. And for these
tight little patterns, you can place your stop at a true
failure point, rather than at a simple testing of the bottom
of the pattern (which is often times insignificant). |
|

|
|
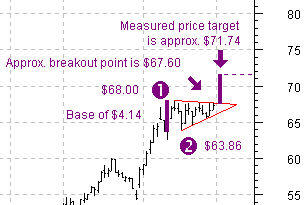
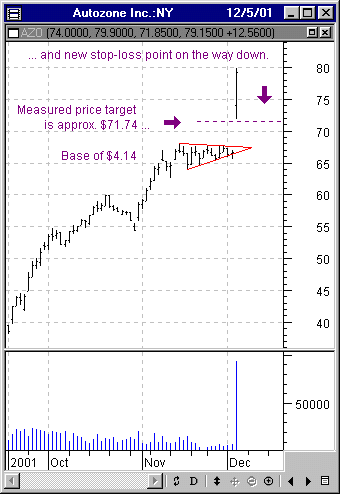
You'll also want to determine your
minimum price target by measuring the projected move. To do
this, you'll want to find the size of the pattern's base and
then add that to the approximate breakout point to come up
with your measured move. To find the size of the base,
subtract the low of point 2 from the high of point 1. |
 |
|
|
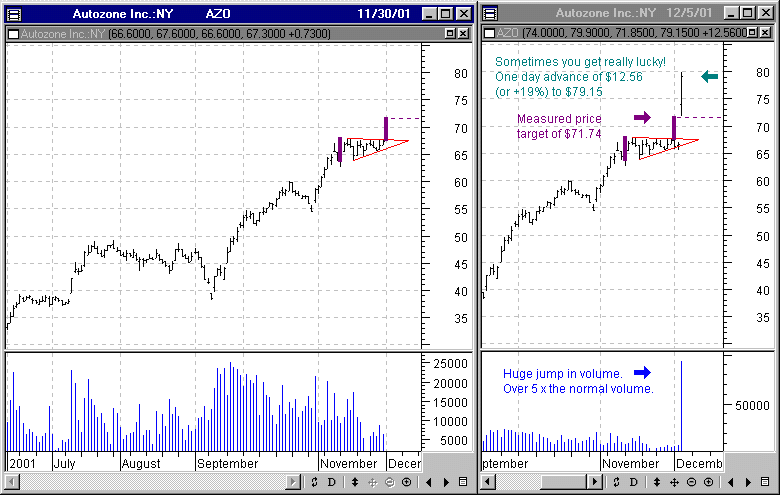
Here's another shot of that huge one-day move, without any
annotations on the chart, so you can see just how spectacular of a
move that really was. These kinds of 'gifts' are rare and you're
truly lucky to catch something like this. And while no one could
have predicted a $12 one-day up move, the pattern did predict an
upside breakout. And if you got in because of that, you would have
been in for the big move that followed.
Now let's take a look at the market in the few days
prior to its up move up and then we'll talk about exiting your
trade.
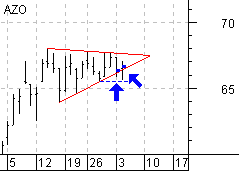
In each of the last two days prior to its big
move, there was a minor test of the downside (support). A quick yet
anemic probe of the downside on weak volume is no cause for concern.
And a close above support confirms the pattern's intact. (The close
of those 2 days are emboldened in blue.) As a rule of thumb
(assuming your personal money management rules/risk of loss are
followed), a move through the 4th point (see the dotted
blue horizontal line) is your failure point. In this example, it
remained unchallenged. However, it should noted, that a breaking of
support on gaining volume (the 4th point
notwithstanding), is a cause for concern and should be considered a
cue for failure and exit. |

|
|
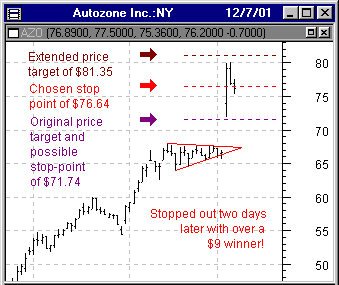
On
12/5/01, the market gapped open $7.44 higher to $74.00
($2.26 above the measured price target of $71.74). It then
backed off a bit, putting in a low of $71.85 (still staying
above the $71.74), before racing higher to $79.90 and
settling at $79.15 for a one day gain of $12.56.
The
measured price target of $71.74 is important because, when a
market blows past your target price, that marker should now
become your stop-loss point.
As
you know, there are different types of gaps (ordinary,
breakaway, measuring and exhaustion), with the breakaway
and the measuring gap being bullish, offering support to the
market.
But
often times, figuring out what kind of gap you're dealing
with isn't always that easy. So determining your sell points
are important. And with a big score like this one, I'd be
willing to see what more is in store for the stock, but I
wouldn't be willing to let a big gain like that disappear
entirely.
So
the first course of action would be to place you stop at
your first measured price target of $71.74.
Now with a more than $7 move right on the open, you might
have been tempted to take your money and run. And if you
did, there's nothing wrong
with that.
In fact, I'm a big
advocate of
taking your windfalls as soon as they happen
(before it turns out to no longer be a windfall). |
 |
|
But, when something big happens, often it gets even bigger.
So instead of exiting to secure a certain dollar gain
(whether it be $7, $6, $5 or $9), let the day play out with
your stop in place. The rationale being; if it keeps on
going higher, you're in, and if it goes down and actually
stops you out with a profit, you're still a winner because
that's what you were hoping to make in the first place when
you put on the trade.
|
|
After the day's action is done, you can now refine your exit
points to try and lock in more of your gains.
In
trying to determine your extended price targets and
additional stop-loss points, go back and re-evaluate the
pattern.
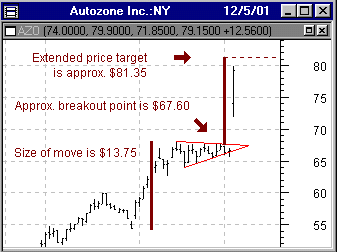
Measuring the preceding uptrend is a good place to start. In
this one, the preceding uptrend (the rapid advance) could be
interpreted as a 'pole'; as in the up-move prior to the
forming of a bull flag and/or bull pennant. In a bull flag
and bull pennant, the rise prior to the forming of the
consolidation pattern is usually so big and so quick, that
the move (usually just one or a few days), appears to have
gone nearly straight up, resembling a pole waving a flag or
pennant. (More on flags and pennants and their 'poles'
later.) While the prior move
in this example isn't |

|
|
technically a 'pole', measuring the move nonetheless,
is still an excellent way to find extended upside
objectives. To measure the preceding move, just subtract the
low of the start of the advance from the high point (point
1) of the pattern. (In this case, the 'symmetrical'
triangle.) Add that to the breakout point for your extended
price target. |
|
Now it's time to determine our possible exit points.
When
doing so, especially with a big, quick move like in this
example, I'll often ask myself a question: What
would make me most upset? Being in (going for a bigger gain)
and seeing the market go down and having to give back 'x' in
profits, or being out (having secured my profit) and
watching the market go even higher and missing out on the
extended move?
Answering
that, will help you determine your most appropriate course
of action.
In
fact, you may have answered that question before the end of
the day and decided to get out on the close. I've done that
many times.
But
for this example, let's assume we're still in and let's take
a look at our choices and how we arrive at them.
Since
we have about a $12 gain, I'm definitely not allowing a
retracement back to the breakout point. Since this 'gap and
run' was made on extremely heavy volume in a mature uptrend, there's a chance it
could be an exhaustion gap, so I'm also not willing to let
the market go much into the gap. (My measured price target,
which is now a potential stop-out point will take care of that.) And
since even a 33% or 50% retracement of the move (common
retracement figures) equals a $4.14 and $6.26 pull-back
respectively, I'll choose a different point. (That's way too
much to give back.) By the way, when I'm figuring the
'move', you can choose to use the entire day's move
(previous close to the new high) or the day's net change
(previous close to the recent close). Since this move took
place in just one day and it closed near its highs, I've
chosen to use the net change as my 'move'. (As you can see,
determining your stop points is part science and part
personal risk tolerance.) Anyway, it's my contention that
giving it 20% leeway is the right place to call it quits. I
believe 10% is too little for such a big advance, but
anything more than 20% sacrifices too much money.
So
simply figure out the size of the move and then subtract 20%
for your stop-out point. In this case, subtract the
previous day's close ($66.59) from the recent close
($79.15). That's a $12.56 move. Then subtract 20% of the
move (less $2.51) from the recent close ($79.15) for your stop-out point of
$76.64.
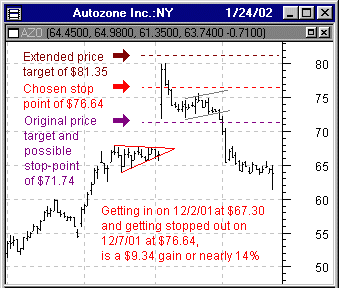
Let's see how it played out. |
|
|
|
|

|
The
market continues to erode, forms a sloppy 'bearish flagging'
pattern and then quickly erases all of its gains and then
some. This is why a well thought out exit strategy is so
important. |

|
|
|
If neither the extended price target or stop-loss
point is hit, I'll typically watch and see if a new pattern
forms. And based on whether it's a bullish or bearish
pattern, you can either hold on, buy more, get short or just
get out. |
|
|
© Copyright 2001, 2002 chartpatterns.com, Pattern Recognition Services |
|
End
of Chapter One.
Chapter
One. To
Chapter Two. Chapter
Three.
The
complete User Manual is coming soon. 40 chapters (each
chapter analyzes a trade) and over 160 pages of info just like this. The most authoritative User
Manual on How to Trade Chart Patterns available. This is
not chart patterns 101, like most of the books out there.
This is straight talking, practical and useful information.
We show winners, losers, how to buy and when to sell. No
fluff and no nonsense. As you can see from this first
chapter, it's jam packed with information from page one to
the very end.
Check
back for more information on pricing and for a printable PDF
copy of this chapter as well as the whole book.
If
you trade chart patterns or wish you knew how, then don't
miss out. |
back
to PRS Home
|

