How to Trade Chart Patterns
A User Manual
Using PRS, Vol. 1, No. 5
as an example
  FISV -- Chapter Two


Flags and falling wedges in uptrends are bullish. For a bullish pattern, the first point (the point farthest left or the earliest) is at the top.

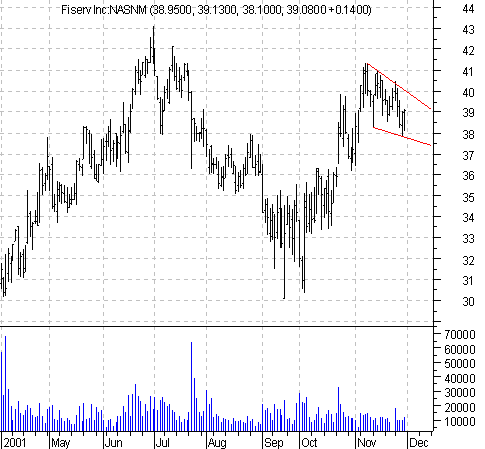
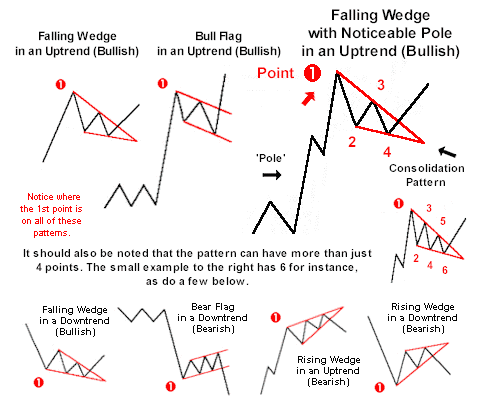
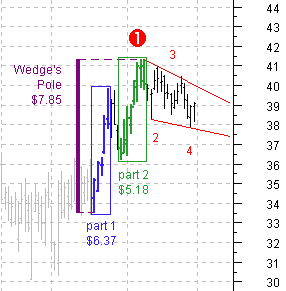
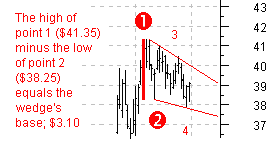
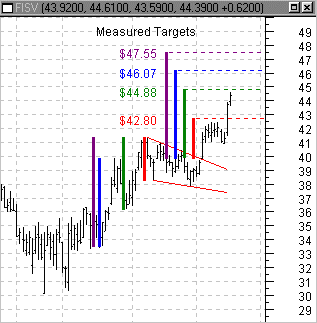
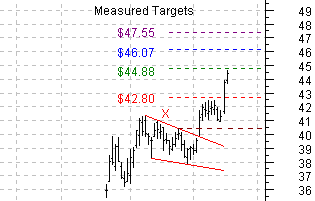
This one is Fiserv (FISV) and is shown with a falling wedge in an uptrend (bullish). And while the consolidation pattern displays a falling wedge, the move preceding it kind of resembles that of a 'pole' (as in flag pole, -- albeit jagged and broken), like you would see in a bull flag set-up.

Like the symmetrical triangle, a bullish flag or wedge's first point (the point farthest left or earliest) is at the top. But unlike the triangle, the move immediately before the consolidation's formation (the 'pole'), is as much a part of the pattern as the flag itself.

Often times, a 'pole-like' move will be seen before the consolidation, as in this falling wedge example. And while the chart for FISV is a less than text-book perfect example of a bullish pole, since it could actually be 'measured' in two places due to a pause on the way up, it nevertheless is unmistakable and will help in determining price targets for trading this falling wedge.

I've measured the size of the pole (preceding move) in three places. The purple measurement (overall pole size of $7.85) simply takes the low of the beginning of the move and subtracts that from the high of the move (point one of the pennant). The first part of the move (blue) measures $6.37 (the low to the high, before the pause and retracement). The second part (green) measures $5.18 (the low after the pause to the high of the move).


And don't forget to measure the base. (The difference between the high of point 1 and the low of point 2.)

Below is a before and after shot. From when FISV was 'spotted' ($39.08 on 11/30/01), it gained +$5.31 or +13.59% in 2 ½ weeks, closing at $44.39 on 12/18/01. From its breakout point of $39.70, it picked up +$4.69 or +11.81%.


You could've gotten in on 12/3/01 at around $39 (a low risk entry since it was so close to the bottom of the pattern or failure/stop out point), or the next day on 12/4/01 at around $39.50 as it traded up to its breakout point on increased volume. If you chose to wait for the breakout, you would have gotten in around $39.80. (Notice how the market gapped up (small gap) over the breakout point on its heaviest volume of the pattern.) 

Within 4 days after the breakout, the market got as high as $42.45, before settling at $41.69. 

Take note: the first target was $42.80. I will sometimes settle for 90% of the measured move if the market backs away after struggling to reach its objective. But if the pattern truly and logically suggests higher prices, I'll typically go for it; setting my stops, and watching for any new pattern that may arise.

Since I'm choosing to go for it (seems like lots of upside potential), I need to determine my stop out point.

I could place my stop at point 2 (red X) of the pattern, but since it's so high up in the formation, I don't believe that gives the trade enough room to base before another move up. I could also put it at the breakout point (red circle) but that's too much money to give back.

So after considering both price and volume, it appears that a logical area that would give the trade room to develop but lock in some profits in case of a failure, is the false breakout attempt on 11/26/01. It seems logical for many reasons. First, the pattern that formed prior to the falling wedge, was a pennant or triangle (as you can see in the image to the right). The attempted breakout (although turned back) was accompanied by increased volume, giving it more importance. After the first try to move higher failed, it fell into a longer and bigger base, which we now recognize as a falling wedge. After finally breaking out of the wedge and overcoming the original failed breakout point of the triangle, logically that resistance would now become a strong support area. So that point ($40.44) will be chosen as the stop in case the market falls back.

As you can see, the market consolidates nicely, testing the 2nd point of the pattern (our rejected stop area -- see red X) using that as support as it gets ready to make another move higher. (Note that the stop out point we chose to go with (brown dotted line) remained unchallenged.)


This time the market easily gets passed our first target of $42.80 and comes up just shy of our 2nd measured target of $44.88.


Once again, you'll have to decide if 90% of the measured move is acceptable or if you're going to go for more. Since, the moves have been made on good volume, I'd opt to hang in there, but I'd move my stop. Calculate the most recent advance (last 3 days = $3.76) and subtract 20% of that (75 cents) from the high of $44.61 for a stop of $43.86. The logic being, if the market is going to power higher, it should do so in a hurry. But if it backs away that much after just missing the 2nd target, it's probably done for the time being and you should lock in some profits.


As you can see, you would've been stopped out the very next day, but with a more than $4.00 gain (+10%) from the breakout point. If you chose the low risk entry, that would have shown a $4.86 gain or nearly 12.5% increase.

 
(And look at how the market erodes after the stop out.) The only thing better than seeing your stock go up after you get in, is to see it go down after you got out!


© Copyright 2001, 2002  chartpatterns.com, Pattern Recognition Services


End of Chapter Two.    

Back to Chapter One.     Chapter Two.     To Chapter Three.

The complete User Manual is coming soon. 40 chapters (each chapter analyzes a trade) and over 160 pages of info just like this. The most authoritative User Manual on How to Trade Chart Patterns available. This is not chart patterns 101, like most of the books out there. This is straight talking, practical and useful information. We show winners, losers, how to buy and when to sell. No fluff and no nonsense. As you can see from these chapters, it's jam packed with information from page one to the very end.


If you trade chart patterns or wish you knew how, then don't miss out.

 back to PRS Home